-
-
Bleeds
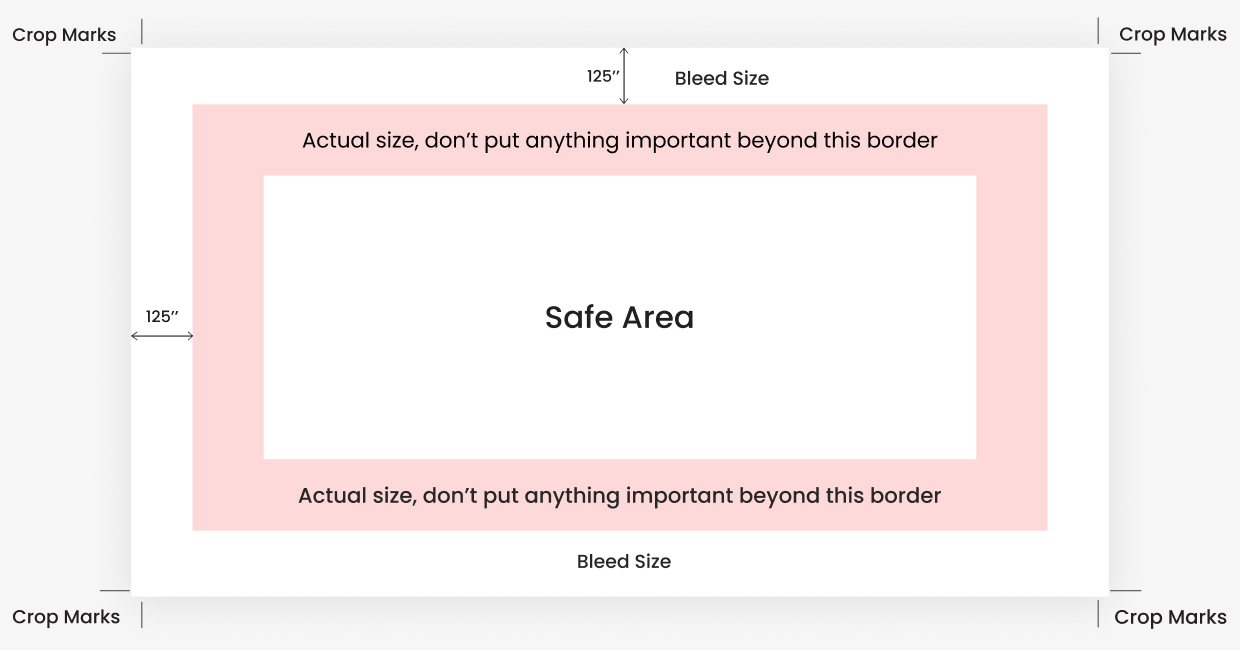
- A bleed refers to the artwork that extends beyond the finished size of the product. To make sure your artwork prints to the edge of your piece, please allow for an additional 1/8″ (.125″) on each applicable side.
- Bleed must extend past the cut line and will be trimmed during the final cutting phase; for a proper finish, ensure all text is at least .125″ inside the cut line, with a bleed of .125″ for standard products and .25″ for booklets and presentation folders.

-
Color mode
Please convert your artwork files from RGB to CMYK; this will deliver the most reliable print and will prevent unexpected changes in color. If your project requires close color matching, it is always a good idea to include a hardcopy proof for us to compare. While we are often able to closely reproduce a spot PMS® ink using full color process, PMS® spot colors and process colors are produced using different methods, so please be sure you are using the correct color conversions. Your choice of paper will also impact color; a smooth uncoated paper will give colors a more muted appearance while a coated or gloss paper will add vibrancy. Printing on colored paper will also impact color.
-
Custom binder templates
-
-
Cut line
When sending an EPS or PDF, make sure you include crop marks so we can cut the job correctly.
-
File sizing
Most projects can be built to the final trim size with no bleed. If you include bleeds in your layout, your files should be 0.25″ larger than the product size that you are purchasing. (i.e. 24″x60″ banner = 24.25″x60.25″ graphic file).
-
File Type
We accept PDF, EPS, TIF, JPG and PSD Be sure to embed fonts or convert to outlines before saving. We can accept native files from Adobe CS6 or MS Office software, but prefer you export it to a PDF to ensure the integrity of your layout. We recommend using PDF/X-3 format when possible. If unable to make a PDF, be sure to package your file for an outside printer with all fonts and linked images.
-
Outlined fonts
Before you submit artwork for print, be sure to outline all fonts. This will ensure your message is crisp and readable with no fuzzy edges. Using your illustration program, please convert all text “to curves” or “create outlines” in your files. Never use the stylization palette to bold, italicize, add drop shadow to, or put outline on your fonts.
-
Resolution
The resolution of an image refers to the amount of detail in the image; the higher the resolution, the more detailed the image. To make sure your printed piece turns out great, black and white line art should be scanned as line art or bitmap at 600 dpi. Photos, color CMYK or grayscale should be scanned at 300 dpi for standard spot or process printing. If your image is less than 300 or 600 dpi, you should replace it with a new image instead of trying to fix it. Images that come to us at lower quality than what is recommended will be output as sent. To guarantee the best quality, do not enlarge images beyond the original size in the design process.
-
Resolution (Large-Format)
100-200 DPI is best for most large-format applications. Larger resolutions just make the file larger and take more processing time without adding visual quality. Submitting files with a lower resolution than 100 DPI can make the image look pixilated and blurry, especially if the file needs to be enlarged. Files that need to be enlarged more than 200% should be at least twice the resolution (200 DPI +) to help ensure the quality of the final print. Use this chart as a guide for art at 100% final size:
-
Safety zone
Do not place any critical images or text beyond the safety zone, which is at least 1/8″ (.125″) from the final trim size. This helps avoid it getting cut off when the finished piece is trimmed.
-
Setting up for clear dry ink
- Dry Ink in itself adds a certain amount of sheen to the page. To maximize the effect of adding Clear Dry Ink to your design, be sure to place your clear elements on top of or next to light colors.
- Check your PDF file in Acrobat Pro Print Preview before sending it to us: Advanced > Print Production > Output Preview. Check > Simulate Overprinting.
-
Text margins
If your graphic files contain a border, the border must have a minimum 1/8″ (.125″) from all surrounding edges. If you leave less than .125″, your finished product may result in unequal borders from top to bottom and from side to side. This is due to the final cutting process where some “draw” or “slippage” may occur. Ideally, you want to create the border with 1/4″ (.25″) from all surrounding edges.
-
Tri-fold templates
-
Typographic/Grammar errors
Make sure you have proofread your artwork to ensure the spelling and grammar is correct. We will not be held responsible for typographical or grammar errors.
-
White ink
White ink can be used on digital devices. We offer this service on our large format UV printing devices.
Let's Bring Your Vision to Life
Helping you achieve your goals is our priority
